
2004 - PSD
2005 - Globe
2006 - Biocomplexity
2007 - NPS
2008 - Ethiopia
2009 - Ethiopia
2011 - National Parks
2012 - Mongolia
2013 - Poudre River
2015 - Secondary Cities
2016 - NREL Projects
Web Template Guide
Download
Download the winzip file! This file contains all the files you will need for your web template.
Template Guide
1. Download the WebTemplate.zip file to your group web folder (assigned later in the semester), to your personal folder in your homes directory (p:drive) into a folder named "web_docs" that you will create for your personal website, or to a folder on your desktop (click the link or right-click the link and select Save Target As... and save the WebTemaplate.zip file to your desired location).
2. Right click on the WebTemplate.zip file using WinZip©, select WinZip, and select Extract to here... to extract all files to your new folder.
3. Copy AboutUs.html and rename it Introduction.html. Repeat this process so that you now have each of the following files in your web folder:
- Introduction.html
- LocationMap.html
- BaseMap.html
- DatabaseSchema.html
- Conventions.html
- GISAnalyses.html
- Flowchart.html
- GISConcepts.html
- Results.html
- Conclusion.html
- References.html
4. Open each new web page and start entering new web content. Be sure to rename the "title" attribute in Dreamweaver for each page. Notes about editing the web content using Dreamweaver are below.
Notes and tips...
You may enter text or add images within the main body of the template using the Dreamweaver software in the lab as you see fit to meet the project or assignment objectives. Lab 1 will give you more detailed instructions by having you use the template to create a personal website in your home directory within the Warner College of Natural Resources in your p:drive.
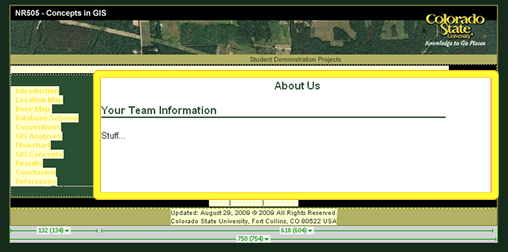
Please only edit the content of the main body as illustrated in the figure below and shown by the yellow box containing the default text: "About Us - Your Team Information. Stuff...". The image below was taken from Adobe Dreamweaver CS3 looking at the AboutUs.html file. The light cream-colored regions are Dreamweaver Library items and should not be altered (you will be given instructions on how to do this in Lab 1 if you want to do this). The "About Us" text is an <h1> html element and the "Your Team Information" text is an <h2> html element.
A note about images...
The main banner image may be altered for your group project. However, if you choose to do this, you must create a .jpg file that measures 750 pixels wide and 99 pixels high and you must save your image within the "images" folder included in the WebTemplate.zip file and it must be named Banner_1_01.jpg. You will need to replace the existing file. We strongly recommed incorporating a CSU logo into your new banner image. We have provided you with a .png file (Banner_1_01.png) that can be edited in Adobe Fireworks or Photoshop that contains a CSU logo as a "Layer" that you can use. The images folder would also be a good place to store your images for your base map (images can be exported from ArcMap in layout view in a variety of file formats) and other illustrations and/or maps that you feel will help communicate your project methods and/or results successfully.
To add images: (1) Click Insert -> Image from the main menu along the top of Dreamweaver, (2) in the Select Image Source dialog box, browse to an image and enter some alternative text, leaving the Long Description default as is. Note: images must be no more than 610px wide.
To create your CD-ROM version...
To create a stand-alone copy your web folder onto your CD-ROM. The steps to follow to create your CD-ROM version of your website using this template are as follows:
- Copy your groupX web folder (and all of your html files and related files within it) from the WCNR server location into a folder on your desktop named NR505_groupX_2009
- Burn your folder NR505_groupX_2009 folder onto a CD-ROM using any software you prefer
- Double check that your website functions directly from your CD-ROM by opening your Index.html file from the CD-ROM itself. All links (internal and external) must work for proper final project credit
Folders and files you will need contained in the zip file:
Folder: "Images" and all of its files
Folder: "Library" and all of its files
Folder: "Stylesheets" and all of its files
File: "Index.html" and all other files you have created.
If you have any questions or need any assistance using the website template, please contact:
Teaching Assistant: Greg Newman
NESB A219 Tel: 491-0410
e-mail: newmang@nrel.colostate.edu
...