
Template Guide
Copy and paste the template in your group folder and name your new file Introduction.html. Repeat this process so that you now have each of the following files:
- Introduction.html
- LocationMap.html
- BaseMap.html
- DatabaseSchema.html
- Conventions.html
- GISAnalyses.html
- Flowchart.html
- GISConcepts.html
- Results.html
- Conclusion.html
- References.html
You may enter any text and or images within the main body of the template using the Dreamweaver software in the lab as you see fit to meet the project objectives
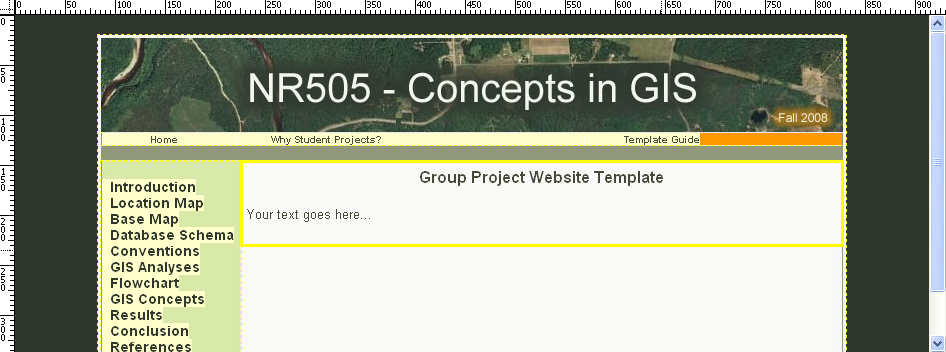
Please only edit the content of the main body as ilustrated in the figure below and shown by the yellow box containing the default text: "Group Project Template: Your text goes here...". The image below was taken from Macromedia Dreamweaver 8 in the WCNR labs. The light cream colored regions are Dreamweaver Library items and should not be altered.
To create your CD-ROM version...
To create a stand-alone copy of your website, you will need to copy a few files (see below) and place them in a folder on your CD-ROM. The steps to follow to create your CD-ROM version of your website using this template are as follows:
- Download the winzip file to your desktop (right-click on the file and choose Save Target As...)
- Unzip this file to your desktop using WinZip (it will create an NR505 folder)
- Copy your groupX folder (and all of your html files and related files within it) from the WCNR server location into this new folder that was created when you unzipped the winzip file
- Browse to your Introduction.html file and open it (it should open in a web browser) to check to make sure that it works properly and is the same final version you have been editing on the WCNR server
- Burn this new folder (named NR505) onto a CD-ROM using any software you prefer
- Double check that your website functions from your CD-ROM by opening your Introduction.html file from the CD-ROM itself
Folders and files you will need and contained in the zip file:
Folder: "images" and all of its files
Folder: "Library" and all of its files
Folder: "stylesheets" and all of its files
File: "Index.htm"
File: "TemplateGuide.html"
File: "WhyProjects.html"
To make this easy, I have created a winzip file you can use and extract to your desktop.
Your folder on your desktop should look like this (group1 being whichever group you are):

A note about images...
Finally, the main banner image containing the embedded text "NR505 - Concepts in GIS" may be altered for your group project. However, if you choose to do this, you must create a .jpg, a .gif, or a .png file that measures 742 pixels wide and 94 pixels high and you must save your image within your "groupX" folder. I recommend creating an "images" folder within your "groupX" folder. This approach can be a good strategy to organize your images as needed. This would also be a good place to store your images for your base map (images can be exported from ArcMap in layout view in a variety of file formats) and other illustrations and/or maps that you feel will help communicate your project methods and/or results successfully. You will need to browse to this location to insert your personalized banner image in replace of the one used for the template. To do this: (1) left click on the image in the display window in Dreamweaver, (2) click delete on your keyboard, (3) Click Insert -> Image from the main menu along the top of Dreamweaver, (4) in the Select Image Source dialog box, browse to an image and enter some alternative text, leaving the Long Description default as is. Note, by doing these steps, you will only be inserting an image for the page you are editing and you will no longer be making use of the template Libray item. Thus, you will need to repeat these steps for each of your webpages if you want all of your pages to have the same banner image (your new image).
If you have any questions or need any assistance using the website template, please contact:
Teaching Assistant: Greg Newman
Office hours: 2 – 5pm, TTh, by appt.
NESB A219 Tel: 491-0410
e-mail: newmang@nrel.colostate.edu